Content from Why of cloud computing
Last updated on 2023-05-04 | Edit this page
Overview
Questions
- What is cloud computing?
- What are the tradeoffs of cloud computing?
Objectives
- Understand benefits of working on a remote computer system
There are a number of reasons why accessing a remote machine is invaluable to any scientists working with large datasets. In the early history of computing, working on a remote machine was standard practice - computers were bulky and expensive. Today we work on laptops or desktops that are more powerful than the sum of the world’s computing capacity 20 years ago, but many analyses (especially in genomics) are too large to run on these laptops/desktops. These analyses require larger machines, often several of them linked together, where remote access is the only practical solution.
In recent years, computational power has become a commodity and entire companies have been built around a business model that allows you to “rent” one or more linked computers for as long as you require, at relatively low cost. This is the basic principle behind the cloud. You define your computational requirements and off you go.
You’ll know you need to start working on the cloud when:
- Your computer does not have enough resources to run the desired analysis (memory, processors, disk space, network bandwidth).
- Your computer is taking hours or days to get through an analysis.
- You cannot install software on your computer (application does not have support for your operating system, conflicts with other existing applications, etc.)
- You cannot afford the infrastructure (hardware, bandwidth, power supply, administrator) required to acquire and maintain sufficiently large computers for your analysis.
- You need to continue working on your analyses while you travel.
The cloud is a part of our everyday life (e.g. using Amazon, Google, Netflix, or an ATM involves remote computing). The topic is fascinating, but this lesson says ‘5 minutes or less’ so let’s get connected.
Choosing a cloud platform
The most important thing about the cloud is choice - instead of purchasing a physical computer, you can obtain on-demand computing at almost any scale. This power comes with advantages and disadvantages:
Advantages of Cloud Computing
- Access large amounts of computing power on demand
- Full administrative rights - install anything
- Use pre-configured “images” (machine snapshot where operating system and software are already installed)
- Your local operating system doesn’t matter - once you connect to the cloud you can run any UNIX software
Disadvantages of Cloud Computing
- It takes time to upload data and download results
- Cloud computing costs money (you must keep track of your costs)
- If you need help, you may not have a local system administrator
- Images may be poorly documented (you may not be clear on what is installed, or how to use it)
- Form of payment (credit card)*
- Understanding of Amazon’s billing and payment (See: Getting started with AWS Billing and Cost Management)
* You can use some of Amazon Web Services (AWS) for free, or see if you qualify for AWS Cloud Credits for Research (See: https://aws.amazon.com/research-credits/ ). The free level of service will not be sufficient for working with the amount of data we are using for our lessons.
Cloud platform choices
There are several cloud providers to choose from. Some scientific clouds may either be free or allocate resources competitively. Commercial clouds can be very powerful, but choice can be overwhelming. We will come back to this at the end of the lesson, but for right now, we’re going to continue using the Amazon Web Services as our resource.
Learn more about cloud computing in bioinformatics
Fusaro VA,
Patil P, Gafni E, Wall DP, Tonellato PJ (2011) Biomedical Cloud
Computing With Amazon Web Services. PLoS Comput Biol 7(8):
e1002147. doi: 10.1371/journal.pcbi.1002147
Content from Logging onto Cloud
Last updated on 2023-05-04 | Edit this page
Overview
Questions
- How do I connect to an AWS instance?
Objectives
- Log onto to a running instance
- Log off from a running instance
Important Note
This lesson covers how to log into, and out of, an already running Amazon instance.
If you’re returning post-workshop and want to launch your own instance, use launching cloud instances on your own
Background to AWS
Setting up a new AWS instance requires a credit card, an AWS account, and up to a day of verification time, but you’ve already spent most of this workshop working in the cloud! To save time, your instructor launched a remote computer (instance) for you prior to the workshop, and connected it to our lesson data. You’ve already logged into it at least once, but now that you’re more comfortable with the command line, lets go back and talk about how it all works.
We have a pre-configured copy of the data needed for this workshop that is always available to attach to a new instance on Amazon, as long as you have an account, and the log-in credentials to open it.
To access the pre-configured workshop data, you’ll need to use our log-in credentials (user name and password). These credentials will be supplied by your instructor.
But first, you need a place to log into! To find the instance that’s attached to that data, you’ll need something called an IP address. Your instructor should have given this to you at the beginning of the workshop.
An IP address is essentially the numerical version of a web address like www.amazon.com
Recall that cloud computing is about choice. You can rent just a single processor on a large computer for a small project, or you can rent hundreds of processors spread across multiple computers for a large project. In either case, once you rent the collection of processors, Amazon will present your rental to you as if it was a single computer. So, the physical computers that host your instances don’t really move, but every time you launch a new instance, it will have a new IP address.
So, each time you launch a new instance, the IP address changes, but your Log-in Credentials don’t have to.
Connection Protocols
We will use a protocol called Secure Shell (SSH) that, as the name implies, provides you with a secure way to use a shell. In our case, the shell will be running on a remote machine. This protocol is available for every operating system, but sometimes requires additional software.
Logging onto a cloud instance
Please select the platform you wish to use for the exercises:
Connecting using PC
Prerequisites: You must have an SSH client. There are several free options but you should have installed PuTTY.exe at the begining of the workshop, and we’re going to continue using that.
Open PuTTY
Paste in the ‘Host Name (or IP address)’ section the IP address provided by your instructor (or the IP address of an instance you have provisioned yourself)
Keep the default selection ‘SSH’ and Port (22)
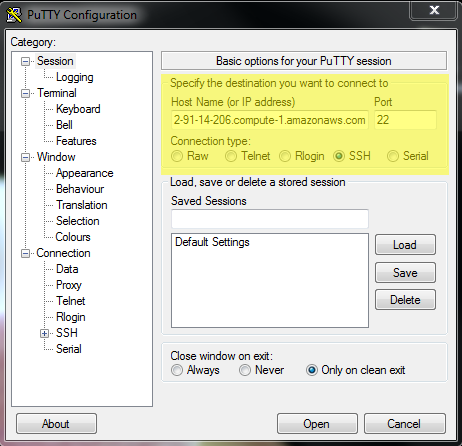
- Click ‘Open’
You will be presented with a security warning
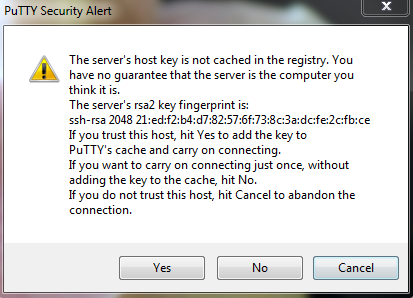
Select ‘Yes’ to continue to connect
In the final step, you will be asked to provide a login and password
Note: When typing your password, it is common in Unix/Linux not see any asterisks (e.g. `****) or moving cursors. Just continue typing
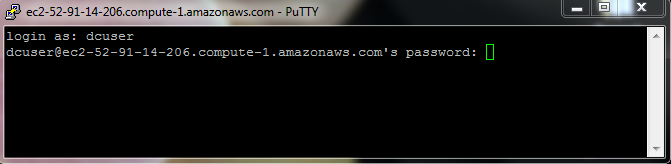
You should now be connected!
Connecting using Mac/Linux
Mac and Linux operating systems will already have terminals installed.
- Open the terminal
Simply search for ‘Terminal’ and/or look for the terminal icon

- Type the following command substituting
ip_addressby the IP address your instructor will provide (or the IP address of an instance you have provisioned yourself)
Be sure to pay attention to capitalization and spaces
- You will receive a security message that looks something like the message below
BASH
The authenticity of host 'ec2-52-91-14-206.compute-1.amazonaws.com (52.91.14.206)' can't be established.
ECDSA key fingerprint is SHA256:S2mMV8mCThjJHm0sUmK2iOE5DBqs8HiJr6pL3x/XxkI.
Are you sure you want to continue connecting (yes/no)?
Type
yesto proceedIn the final step, you will be asked to provide a login and password
Note: When typing your password, it is common in
Unix/Linux not see any asterisks (e.g. ****) or moving
cursors. Just continue typing.
You should now be connected!
Logging off a cloud instance
Logging off your instance is a lot like logging out of your local computer: it stops any processes that are currently running, but doesn’t shut the computer off. AWS instances acrue charges whenever they are running, even if you are logged off.
If you are completely done with your AWS instance, you will need to terminate it after you log off. Instructions for terminating an instance are here: launching cloud instances on your own.
To log off, use the exit command in the same terminal
you connected with. This will close the connection, and your terminal
will go back to showing your local computer:
Logging back in
Internet connections can be slow or unstable. If you’re just browsing the internet, that means you have reload pages, or wait for pictures to load. When you’re working in cloud, that means you’ll sometimes be suddenly disconnected from your instance when you weren’t expecting it. Even on the best internet connections, your signal will occasionally drop, so it’s good to know the above SSH steps, and be able to log into AWS without looking up the instructions each time.
In the next section, we’ll also show you some programs that you can use to keep your processes going even if your connection drops. But for now, just practice logging on and off a few times.
Content from Fine tuning your Cloud Setup
Last updated on 2023-05-04 | Edit this page
Overview
Questions
- Is my remote computer correctly configured?
- How do I keep my processing going when I leave?
Objectives
- Check the available resources and file system on your remote machine
- Keep background processes working in the cloud with
tmux
Is this the right cloud?
Once you’re connected to your new remote instance, it’s a good idea to double check that the settings are what you wanted, and that everything is working smoothly before you start your project.
For this workshop, your instructor did all the verification before the workshop even started, but this is an important skill for when you start running your own instances.
Verifying your connection
When you connect, it is typical to receive a welcome screen. The Data Carpentry Amazon instances display this message upon connecting:
OUTPUT
Welcome to Ubuntu 20.04.5 LTS (GNU/Linux 5.4.0-137-generic x86_64)

 * Documentation:  https://help.ubuntu.com
 * Management:     https://landscape.canonical.com
 * Support:        https://ubuntu.com/advantage

  System information as of Wed 25 Jan 2023 05:17:10 AM UTC

  System load:  0.9                Processes:             204
  Usage of /:   19.7% of 98.27GB   Users logged in:       0
  Memory usage: 6%                 IPv4 address for eth0: 172.31.23.125
  Swap usage:   0%

  Get cloud support with Ubuntu Advantage Cloud Guest:
    http://www.ubuntu.com/business/services/cloud

0 updates can be applied immediately.

New release '22.04.1 LTS' available.
Run 'do-release-upgrade' to upgrade to it.
You should also have a blinking cursor awaiting your command
Verifying your environment
Now that we have connected here are a few commands that tell you a little about the machine you have connected to:
-
whoami- shows your username on computer you have connected to:OUTPUT
dcuser@ip-172-31-62-209 ~ $ whoami dcuser -
df -h- shows space on hard driveOUTPUT
dcuser@ip-172-31-62-209 ~ $ df -h
Filesystem      Size  Used Avail Use% Mounted on
udev            2.0G   12K  2.0G   1% /dev
tmpfs           396M  792K  395M   1% /run
/dev/xvda1       99G   48G   47G  51% /
none            4.0K     0  4.0K   0% /sys/fs/cgroup
none            5.0M     0  5.0M   0% /run/lock
none            2.0G  144K  2.0G   1% /run/shm
none            100M   36K  100M   1% /run/user
Under the column ‘Mounted on’ row that has
/as the value shows the value for the main disk -
cat /proc/cpuinfo- shows detail information on how many processors (CPUs) the machine hasOUTPUT
dcuser@ip-172-31-62-209 ~ $ cat /proc/cpuinfo processor : 0 vendor_id : GenuineIntel cpu family : 6 model : 62 model name : Intel(R) Xeon(R) CPU E5-2670 v2 @ 2.50GHz stepping : 4 microcode : 0x415 cpu MHz : 2494.060 cache size : 25600 KB physical id : 0 siblings : 2 core id : 0 cpu cores : 2 apicid : 0 initial apicid : 0 fpu : yes fpu_exception : yes cpuid level : 13 wp : yes flags : fpu vme de pse tsc msr pae mce cx8 apic sep mtrr pge mca cmov pat pse36 clflush mmx fxsr sse sse2 ht syscall nx rdtscp lm constant_tsc rep_good nopl xtopology eagerfpu pni pclmulqdq ssse3 cx16 pcid sse4_1 sse4_2 x2apic popcnt tsc_deadline_timer aes xsave avx f16c rdrand hypervisor lahf_lm xsaveopt fsgsbase smep erms bogomips : 4988.12 clflush size : 64 cache_alignment : 64 address sizes : 46 bits physical, 48 bits virtual power management: processor : 1 vendor_id : GenuineIntel cpu family : 6 model : 62 model name : Intel(R) Xeon(R) CPU E5-2670 v2 @ 2.50GHz stepping : 4 microcode : 0x415 cpu MHz : 2494.060 cache size : 25600 KB physical id : 0 siblings : 2 core id : 1 cpu cores : 2 apicid : 2 initial apicid : 2 fpu : yes fpu_exception : yes cpuid level : 13 wp : yes flags : fpu vme de pse tsc msr pae mce cx8 apic sep mtrr pge mca cmov pat pse36 clflush mmx fxsr sse sse2 ht syscall nx rdtscp lm constant_tsc rep_good nopl xtopology eagerfpu pni pclmulqdq ssse3 cx16 pcid sse4_1 sse4_2 x2apic popcnt tsc_deadline_timer aes xsave avx f16c rdrand hypervisor lahf_lm xsaveopt fsgsbase smep erms bogomips : 4988.12 clflush size : 64 cache_alignment : 64 address sizes : 46 bits physical, 48 bits virtual power management: -
tree -L 1- shows a tree view of the file system 1 level below your current location.OUTPUT
dcuser@ip-172-31-62-209 ~ $ tree -L 1
.
├── dc_sample_data
├── Desktop
├── Downloads
├── FastQC
├── openrefine-2.6-beta.1
├── R
└── Trimmomatic-0.32

7 directories, 0 files
Staying Connected to the Cloud
Depending on how you connect to the cloud, you may have processes and
jobs that are running, and will need to continue running for some time.
If you are connecting to your cloud desktop via VNC, jobs you start will
continue to run. If you are connecting via SSH, if you end the SSH
connection (e.g. you exit your SSH session, you lose your connection to
the internet, you close your laptop, etc.), jobs that are still running
when you disconnect will be killed. There are a few ways to keep cloud
processes running in the background. Many times when we refer to a
background process we are talking about what is described
at this tutorial - running a command and returning to shell prompt.
Here we describe a program that will allow us to run our entire shell
and keep that process running even if we disconnect: tmux.
If you don’t have tmux on your system, you should still be
able to use screen. This is another program that has mostly
the same capabilities as tmux. It’s a lot older, though, so
can be more clunky to use; however, it is likely to be available on any
cloud system you encounter.
In both tmux and screen, you open a
‘session’. A ‘session’ can be thought of as a window for
tmux or screen, you might open an terminal to
do one thing on the a computer and then open a new terminal to work on
another task at the command line.
As you work, an open session will stay active until you close this session. Even if you disconnect from your machine, the jobs you start in this session will run till completion.
For the following instructions use either tmux OR
screen, not both!
Starting and attaching to a session
You can start a session and give it a descriptive name:
-
tmux -
screen
This creates a session with the name session_name which
will stay active until you close it.
Detach session (process keeps running in background)
You can detach from a session by pressing on your keyboard:
-
tmux:control + bfollowed byd(for detach) -
screen:control + afollowed byd(for detach)
Seeing active sessions
If you disconnect from your session, or from your ssh into a machine, you will need to reconnect to an existing session. You can see a list of existing sessions:
-
tmux -
screen
Installing additional software
By default tmux is not installed in most cloud Linux
instances. However when you start a new instance, you can install new
software packages using Package Managers like YUM (for Red Hat and
Centos instances) or APT (for Debian or Ubuntu instances).
Search for APT packages using including software
Most common software tools will have a package named with the same
name, but this is not always the case. If you know the name of the
program you wish to install, but are not sure of the package name, you
can use the apt program to search packages:
BASH
$ apt search tmux
Sorting... Done
Full Text Search... Done
tmux/trusty,now 1.8-5 amd64 [installed]
  terminal multiplexer
$
On our system, searching for tmux only gives one result, and it is already installed.
Install packages using APT
If you own, or at least have administrator privileges on an instance,
you can also use APT to install a package. First you would need the
package name, which is whatever is before the / in your
search result. In our example above with tmux, we got
which means that it is stored in APT as tmux.
Once you know the package name, you could install it using
apt install:
Update APT
Before installing or upgrading any system packages, you should always
update the local APT cache. That ensures you’ll install the latest
version. Note that the instructions now start with sudo,
which is short for ‘super user do’. sudo is a program that
allows a user to users to run programs as an administrator without
logging off and then logging back in as the admin.
So, in this line:
we are first invoking sudo, and then having the
sudo program run apt upgrade. This way,
apt upgrade is run from the administrator account. You can
actually try to run that line if you want, you’ll be prompted to input
the administrator password:
Since we don’t have the adminstrator password, our request will be rejected:
BASH
dcuser@ip-172-31-26-134:~$ sudo apt upgrade
password for dcuser:
dcuser is not in the sudoers file.  This incident will be reported.
dcuser@ip-172-31-26-134:~$
If we did have the administrator password, we would have seen this:
BASH
$ sudo apt upgrade
password for dcuser:
Hit:1 http://au.archive.ubuntu.com/ubuntu xenial InRelease
Get:2 http://au.archive.ubuntu.com/ubuntu xenial-updates InRelease [102 kB]
...
Fetched 3,413 kB in 1s (2,233 kB/s)
Reading package lists... Done
And one the cache is updated, we could have then requested that APT
install a program. To have APT find packages, we used
apt search, which told the program APT to run it’s
sub-program ‘search’ but to install packages, we need to use the
subprogram ‘install’. Confusingly, there is also an apt-get
program with an ‘install’ subprogram which does exactly the same thing,
in 99% of cases, it doesn’t matter whether you use
apt install or apt-get install.
As with the ‘upgrade’ command, this will require the administrator password that we don’t have, but on your own machine, you’d get output like this:
BASH
$ sudo apt install tmux
password for dcuser:
Reading package lists... Done
Building dependency tree
Reading state information... Done
The following additional packages will be installed:
  libevent-2.0-5 libutempter0
The following NEW packages will be installed:
  libevent-2.0-5 libutempter0 tmux
0 to upgrade, 3 to newly install, 0 to remove and 0 not to upgrade.
Need to get 345 kB of archives.
After this operation, 949 kB of additional disk space will be used.
Do you want to continue? [Y/n] y
Get:1 http://mirror.overthewire.com.au/ubuntu xenial-updates/main amd64 libevent-2.0-5 amd64 2.0.21-stable-2ubuntu0.16.04.1 [114 kB]
Get:2 http://mirror.overthewire.com.au/ubuntu xenial/main amd64 libutempter0 amd64 1.1.6-3 [7,898 B]
Get:3 http://mirror.overthewire.com.au/ubuntu xenial/main amd64 tmux amd64 2.1-3build1 [223 kB]
Fetched 345 kB in 0s (863 kB/s)
(Reading database ... 130583 files and directories currently installed.)
...
Setting up libevent-2.0-5:amd64 (2.0.21-stable-2ubuntu0.16.04.1) ...
Setting up libutempter0:amd64 (1.1.6-3) ...
Setting up tmux (2.1-3build1) ...
Processing triggers for libc-bin (2.23-0ubuntu10) ...Content from Which Cloud for my data?
Last updated on 2023-05-04 | Edit this page
Overview
Questions
- What cloud resources are available?
- How do I choose my resources?
Objectives
- Describe the advantages and disadvantages of various cloud computing platforms.
- Determine what resources a project will require
- Match required resources to computing platforms
Cloud platform choices
There are several cloud providers to choose from. Some scientific clouds may either be free or allocate resources competitively. Commercial clouds can be very powerful, but choice can be overwhelming. Availablity of public and commercial cloud resources also vary by country and region.
The major tradeoff between platforms is between flexibility and cost. Generally speaking, services that allow you more flexibility and autonomy, will be more expensive than highly managed services.
Below, we have highlighted the three types of computing resources: Clusters, Open Science Clouds, and Commercial Clouds, which are widely available to researchers around the world. However, the availability of any specific cluster or cloud may be region specific, and this is not meant to be an exhaustive list. We encourage researchers to use this list as a starting point for learning about cloud resources and suggest checking with your local or regional government to see what other Open Science Clouds might be available to you. The cloud resources listed here should be available to any scientist based in the US, but may be unavailable, or have different pricing, in other countries.
University/Corporate Computing Clusters
Many universities and businesses operate their own computing clusters that are available to students and staff at low or no cost. If your employer maintains a computing cluster, this will almost always be the least expensive option.
However, most HPCCs (High Performance Computing Clusters) put limits on:
- The number of processors a user can utilize at once
- The amount of disk storage per user
- The amount of time a single process can run
- What programs can be installed, and by whom
- Who can have accounts and access data
HPCCs are also a shared resource, so even when you have access, your programs are unlikely to run immediately. Most HPCCs run some kind of scheduler, that you submit your processing jobs to, and it runs them as resources become available. In order to submit a job, you generally will need to know not only what program you want to run, but with how many processors and for how long. While interacting with the scheduler is no more difficult than interacting with the shell, it will have its own set of commands and syntax that you’ll need to learn; and these vary widely among HPCCs.
There are also many upsides to using an HPCC. As previously mentioned, they’re generally the least expensive option, but they often come with more perks. For instance, many HPCCs offer free or low-cost training, storage space, back-up options, and technical support. If your HPCC has a scheduler, you can also queue up many sequential jobs all at once, and you don’t have to worry about racking up fees on instances that are sitting idle. It’s often also much easier to pay for HPCC use than to pay for Amazon using grant money, however universities are getting better about AWS payments.
Open Science Clouds
XSEDE
The Extreme Science and Engineering Discovery Environment (XSEDE) is an NSF funded HPCC, so it is open to any US-based researcher, and shares most of the same benefits and drawbacks of a university or corporate HPCC. If your university or corporation doesn’t have it’s own HPCC resources, XSEDE will likely be your cheapest option.
Although any US-based researcher can use XSEDE, first they’ll need an account. Like the HPCC options described above, XSEDE uses a scheduler to start jobs, and puts limits on how many resources any one user can utilize at once.
XSEDE can also be a bit intimidating at first because you will need to know what resources you need, and for how long, before you get started. XSEDE runs like a mini version of the NSF grant system. In order to qualify to submit large jobs, you’ll have to submit a allocation request, in the form of a short proposal. Also like an NSF grant, if your proposal is accepted, that means you have access to whatever resources you were approved for, for the time frame you requested.
Don’t let that paragraph scare you off though. XSEDE has two different allocation tracks. If you aren’t sure exactly what you’ll need for your big project, you can request a startup allocation which only requires an abstract rather than a proposal, and grants you a year to try out your new pipeline or analysis. These are usually granted in a week or so, and are intended for you to test your pipeline so you know what to ask for in your allocation proposal.
If that still sounds a little too daunting, XSEDE also has trial allocations which give you access to only a tiny fraction of XSEDES power, but are plenty large enough to test your code and see if a larger allocation is worth pursuing. These allocations are granted more or less immediately by simply filling in a form and agreeing to the usage rules.
If you’re interested in using XSEDE, check to see if your workplace has a Campus Champion. These are people who have had extensive training on both the XSEDE system and the allocation program, and can help you figure out how to apply and what you need.
Open Science Grid
The Open Science Grid (OSG) is an NSF-funded national network of computing centers that have pooled their resources together and made them available to various research groups. The OSG is usable by any researcher based at a US institution, and is accessible for free without an allocation. It can provide millions of computing hours for researchers who have problems that fit well on its setup.
Certain projects and universities have direct access to the Open Science Grid, but any researcher can access it through the OSG Connect entry point. If you apply for OSG access through that website, you will have a consultation with someone who can help you determine if your analysis is a good fit for and how to get started.
The OSG is a great fit for problems that can be broken into lots of independent pieces. One good example is read alignment: the starting read data can be broken into several pieces, each of them aligned, and then the results combined. Another good problem type for the OSG are multi-start simulations or statistical analyses where you need to run the same model or simulation many, many times. The payoff of using this approach is being able to run on many hundreds (sometimes thousands!) of computers at once, accelerating your analysis.
Note that you don’t access a specific computing center through OSG – unlike XSEDE, where you apply for time and then run on a specific HPCC resource, the OSG sits on top of many resources and when you submit your work, it could run almost anywhere in the overall system.
Open Science Data Cloud (OSDC)
The Open Science Data Cloud provides the scientific community with resources for storing, sharing, and analyzing terabyte and petabyte-scale scientific datasets. OSDC’s Bionimbus Protected Data Cloud (PDC) is a platform designed with the sole purpose of analysing and sharing protected genomics data.
Commercial Clouds
Computing architecture is moving (albeit at a slow pace) to the Model-to-Data paradigm. This means that scientists should be encouraged to bring their compute to where the data is stored, instead of the the other way around. The following outlines the general differences between the three major commercial cloud providers: Amazon Web Services (AWS), Google Cloud Platform (GCP) and Microsoft Azure.
Essentially all cloud providers provide extremely similar computing and storage options; you can “rent” or provision computing infrastructure with very similar specifications across all three cloud vendors. Even the costs are highly comparable. What governs how to choose the right cloud computing vendor is highly opportunistic: (1)funding options, (2)solidarity with collaborating/similar scientific groups, (3)location of datasets that a particular research group works with and (4)familiarity with cloud vendor services.
- Funding options: Does your grant stipulate where you should build your computing pipeline? For example, the NIH often partners with specific cloud vendors to provide cloud credits that allow researchers to compute for free. Some cloud vendors also provide research credits.
- Solidarity with collaborating/similar scientific groups: Are other research groups in your field drawn to a specific cloud vendor? It might make sense to utilize the same cloud service to minimize transfer (egress) costs especially if you are sharing large datasets. You may also be able to make use of existing pipelines without reinventing the wheel if you choose the same cloud provider that your collaborators are using.
- Location of datasets that a particular research group works with: Again, thinking of bringing your models to the where the data is stored helps minimize costs and saves you time in having to download and store data separately.
- Services here refer to cloud vendor add-ons that take away the need for a user to set up their own computing infrastructure. A fully managed database (e.g. AWS RDS, GCP CloudSQL, Azure SQL DB) is an example of a service. If you are used to SQL Server, you may want to look into options provided by Azure. Are you more familiar with Postgres SQL? Then AWS and GCP might provide cheaper options for you.
Amazon EC2
The Amazon Web Service (AWS) that you’ve been using is the Elastic Compute (EC2) cloud. There are actually lots of other cloud and storage solutions under the AWS umbrella, but when most data scientists say AWS, they mean EC2. With EC2, you can rent access to a cloud computing resource as small as your laptop, or as large as a 64 processor machine with 488GB of memory, and with a number of different operating systems. These instances can be optimized for jobs that are memory intensive, or require a lot of bandwidth, or almost any other specific need. There are so many options that we can’t cover them all here, but these are a few popular ones:
On-Demand
All this variety and optimization makes EC2 much more expensive than an average HPCC, however, depending on your needs it can be quite affordable. If you want to start an EC2 instance whenever you want and have instant access, you can rent a quite large on-demand instance with 8 processors and 32 GB of memory for ~40 cents an hour, and tiny instances are only about half a cent per hour.
Spot-Instances
If your program can tolerate pauses, and you don’t need the analysis done as fast as possible, you can request a spot instance. Essentially, whenever Amazon has computing capacity that no one is paying them for, they lower the prices for renting some systems. If you request a spot-instance, that means you specify the size and parameters of your machine rental, and set a limit on how much you’re willing to spend per hour. Then, whenever the rental rate dips below your maximum, your instance turns on and runs until the price goes back up. If it’s not an important shopping season, and you aren’t in a hurry, you can often run spot-instances for less than half their normal cost.
Free Tier
There are also free options, which allow you to test out the interface and make sure it will meet your needs before you start renting.
Just remember that with EC2 and all other commercial services, you’re paying for renting the computer, whether you’re using it or not. If you leave an instance on idly for months after your pipeline has finished, you’ll still have to pay for that time.
Google Cloud: getting started
GCP offers very competitive prices for compute and storage (as of July 2019, their compute pricing is lower than that of AWS and Azure for instances of comparable specifications). If you are looking to dabble in cloud computing but do not need a vast catalog of services, GCP would be a good place to start looking.
Their version of “Spot Intances” are known as pre-emptible instances and offer very competitive pricing. GCP also has TPUs.
Microsoft Azure
If your software requires Microsoft Windows, it may be cheaper to use MS Azure due to licensing issues. Azure’s computing instances are known as Azure Virtual Machines and often come at a slightly higher cost than other cloud computing vendors’ offerings. If a lot of your computing pipeling is Windows dependent, it may make sense to build everything on MS Azure from the get go.
IBM Cloud
IBM Cloud offers more than 11 million bare metal configurations in virtual mode which are customizable RAM and SSDs on bare metal. They also have an on-demand provisioning for all servers whose management and monitoring included along with the direct and cost-free tech support
How to Choose
As you can see, highly managed systems (HPCCs, XSEDE, etc) usually are free or cheap, but relatively inflexible. There may be certain programs you can’t install, or there may be long wait times. Commercial systems are generally more flexible because you can make them look however you want, but they can be quite expensive, especially if you run for a long time, or have a lot of data. However, there are other things to consider.
Another way to think about this is not whether you want to spend your time and money, but where you want to spend them. AWS will let you install anything you want, but that also means that you’ll have to spend some time up-front installing programs and testing configurations. Your HPCC jobs might take a week to start, but you don’t have to do any of the systems administration, and you can work on other projects while your job sits in the queue.
Your familiarity with the pipeline can also be a factor. Let’s say you want to run a program you’ve never run before. If you have no way to estimate how long your job will take, a service like AWS might save you money, because you can run your program until its done, no matter how long that is. Running it on an HPCC can be really frustrating, because you’ll need to submit your job with the amount of time and resources it will use. An HPCC will only let your job run the amount of time you requested, so if you underestimate the amount of time it will take, even by one minute, the system kills your program and you need to resubmit it. On the other hand, if you want to run that same program, but you can easily estimate the runtime, an HPCC is going to be a much cheaper choice.
In my work, I often use both commercial and non-commercial services. I tend to use AWS for testing, with small amounts of data, until I know how the program behaves. Then I port the pipeline to my university HPCC for running the full dataset.
Discussion
In small groups or on your own, plot out your next bioinformatics project. With guidance from your instructors and the above references, try to determine not only what types of resources you’ll need, but what platform will best suit your project.
Some things to consider:
- How much data do you have?
- What computational steps will it need?
- What is the largest computational step?
- Can any steps be done in parallel?
- What is your timeframe?
- Who will be doing most of the computational work?
- What computational skills do they have?
- Do you need to share the data across many labs?
- How many times will you need to run this pipeline?
Human genomic data & Security
Note that if you are working with human genomics data there might be ethical and legal considerations that affect your choice of cloud resources to use. The terms of use, and/or the legislation under which you are handling the genomic data, might impose heightened information security measures for the computing environment in which you intend to process it. This is a too broad topic to discuss in detail here, but in general terms you should think through the technical and procedural measures needed to ensure that the confidentiality and integrity of the human data you work with is not breached. If there are laws that govern these issues in the jurisdiction in which you work, be sure that the cloud service provider you use can certify that they support the necessary measures. Also note that there might exist restrictions for use of cloud service providers that operate in other jurisdictions than your own, either by how the data was consented by the research subjects or by the jurisdiction under which you operate. Do consult the legal office of your institution for guidance when processing human genomic data.
Other Resources:
Learn more about cloud computing in bioinformatics:
Fusaro VA, Patil P, Gafni E, Wall DP, Tonellato PJ (2011) Biomedical Cloud Computing With Amazon Web Services. PLoS Comput Biol 7(8): e1002147. doi: 10.1371/journal.pcbi.1002147
Charlebois K, Palmour N, Knoppers BM (2016) The Adoption of Cloud Computing in the Field of Genomics Research: The Influence of Ethical and Legal Issues. PLoS ONE 11(10): e0164347. https://doi.org/10.1371/journal.pone.0164347
Langmead B, Nellore A (2018) Cloud computing for genomic data analysis and collaboration Nature Reviews Genetics 19 (208). doi: 10.1038/nrg.2017.113 (https://www.nature.com/articles/nrg.2017.113)